
Faux stone panels, also called stone veneer, are a lightweight alternative to using real stone to decorate your home. Whether you want to spruce up your home’s interior or boost curb appeal, faux stone panels add texture, visual interest, and warmth to any space.
This guide explains faux stone, offers creative ideas for using faux stone panels in your home, provides tips on choosing the best panel for your project, and outlines the DIY installation process.
What Are Faux Stone Panels?
Faux stone panels are an affordable, realistic, and easy-to-install alternative to real, natural stone. Homeowners use faux stone panels to achieve the same design and aesthetic goals as you could get using real stone. And, just like the real thing, faux stone can be installed over indoor and outdoor walls.
Faux stone panels truly are the best of both worlds. They have the aesthetic appeal you want from real stone, without the extra stress.
Aside from looks, there are many advantages to choosing faux stone panels:
-
Have the same look, texture, and detail as real stone
-
Cost less to purchase, ship, and install compared to real stone
-
Lightweight - won’t put extra stress on the structure of your home
-
Made of high-density polyurethane - resistant to cracking, warping, and chipping
-
Resistant to damage from pests and extreme temperatures
-
Resistant to fading in harsh sunlight
-
Easy to install using basic tools and materials
-
Require little to no maintenance
Stacked stone veneer comes in a variety of styles and authentic colors, allowing you to choose the right look for your space. Below are the eight stacked stone options we offer.
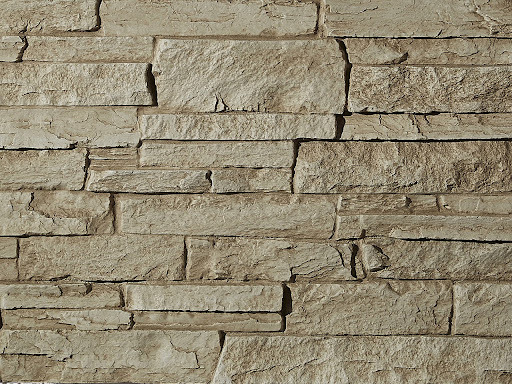
1. Sedona Dry Stack Faux Stone Panels
Available in eight natural-looking colors, Sedona Dry Stack Faux Stone Panels add the rustic, natural look of stone mountains to any space.
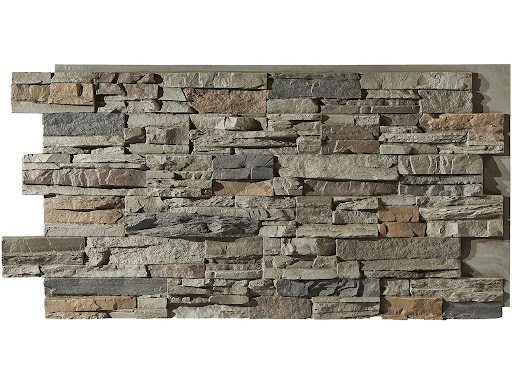 Sedona Dry Stack Faux Stone Panels
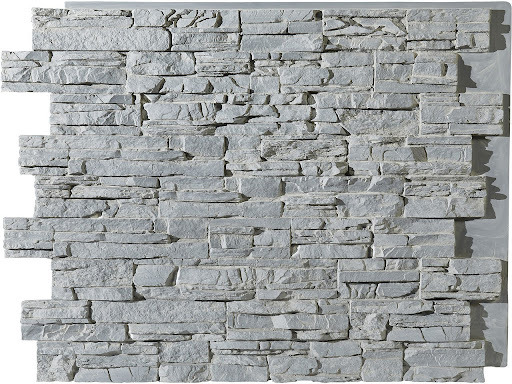 Denver Dry Stack Faux Stone Panels
2. Denver Dry Stack Faux Stone Panels
Add versatility and eye-catching dimension to any vertical surface with Denver Dry Stack Faux Stone Panels.
Create an accent wall, install panels as wainscoting in your home office, or use them to breathe life into your outdoor dining area.
3. Spencer Faux Stone Wall Panels
Bring the classic block look of bluestone to your home using Spencer Faux Stone Wall Panels.
Available in two colors, this head-turning style has all of the benefits of real stone without the complicated installation and expense.
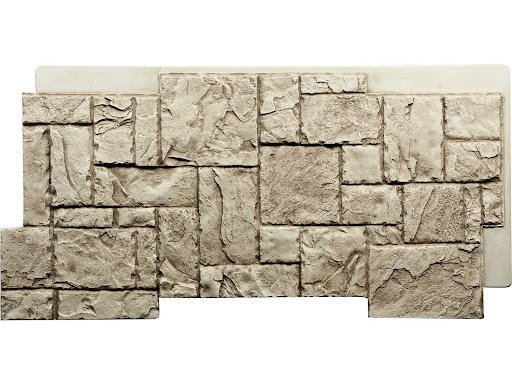 Spencer Faux Stone Wall Panels
 Sardis Fieldstone Faux Stone Wall Panels
4. Sardis Fieldstone Faux Stone Wall Panels
The thick, thoughtfully placed fieldstone in this faux stone wall panel adds bold, rugged charm to any room.
Wherever you install them, Sardis Fieldstone Faux Stone Panels are one of the most captivating faux stone styles available.
5. Lexington Dry Stack Faux Stone Panels
Gorgeous Lexington Dry Stack Faux Stone Panels have the weather-worn look of mountainous stone.
Between the versatile patterning and natural colors, this popular style brings rustic beauty to spaces indoors and out
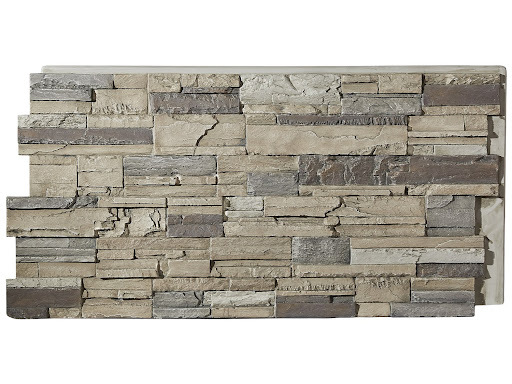 Lexington Dry Stack Faux Stone Panels
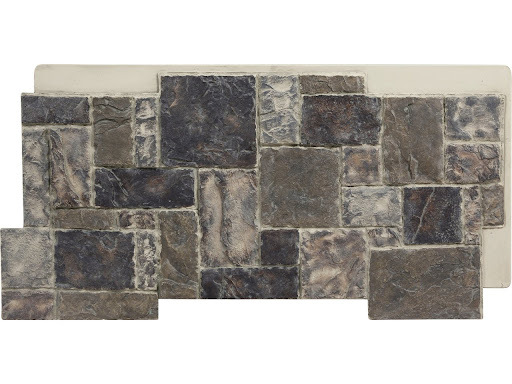 Asheville Block Faux Stone Wall Panel
6. Asheville Block Faux Stone Wall Panel
Asheville Block Faux Stone Panels capture the look of classic bluestone.
The larger stones of this style are perfect for larger surfaces such as wide accent walls and floor-to-ceiling fireplaces.
7. Fargo Dry Stack Faux Stone Wall Panel
Fargo Dry Stack Faux Stone Panels are a smooth, authentic faux stone style. This panel is great for accent walls, wainscoting, and dressing up outdoor kitchen and dining areas.
 Fargo Dry Stack Faux Stone Wall Panel
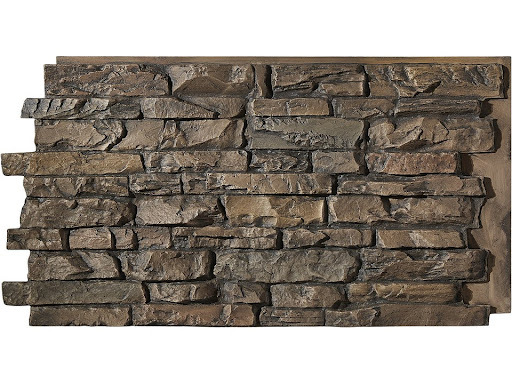 Billings Dry Stack Faux Stone Wall Panels
8. Billings Dry Stack Faux Stone Wall Panels
For a touch of depth and dimension, use Billings Dry Stack Faux Stone Panels. Their stacked stone design mimics rugged, jagged, mountainous rock for a classic stacked stone look.
Frequently Asked Questions About Faux Stone Panels
Faux stone panels offer a cost-effective and stylish way to transform walls, fireplaces, and more. To help you learn more about their uses and advantages, we’ve compiled answers to the most frequently asked questions.
Does faux stone look like real stone?
Faux stone is made to mimic the look and feel of real stone. Panel molds are made from actual stone walls, so the finished faux stone panels are indistinguishable from the real thing.
What is faux stone made of?
Faux stone panels are made of high-density polyurethane foam. Unlike real stone, high-density polyurethane is lightweight, making faux stone panels much easier to install. In addition to its lightweight nature, high-density polyurethane foam is durable and long-lasting.
Is faux stone weatherproof?
Our faux stone panels are made from durable high-density polyurethane, a material able to withstand normal weather conditions like heat, cold, rain, and wind.
How easy is it to install stone veneer?
Installing real stone requires masonry tools and specialized skills. Stone veneer panels , however, are easy to install using basic tools and DIY knowledge.
How much does faux stone siding cost?
Stone veneer panels are far less expensive than real stone.
For example, each Denver Dry Stack Faux Stone Panel covers about 10.88 square feet and costs $210. This makes the faux stone panel just $19.30 per square foot. Natural stone used to cover the same area would cost about $40 per square foot.
On top of material prices, you have to factor in the cost of labor and installation. Faux stone panels are designed to be easy to install yourself, saving you hundreds if not thousands of dollars. Natural stone must be installed by a professional, which can drive up the cost of your project significantly.
How to Install Faux Stone Panels
Installing faux stone panels is an easy, DIY process. In fact, you can install a faux stone accent wall in a matter of a few hours using basic tools and materials.
Before You Get Started
First, make sure you order the right number of panels to complete the job. The amount of faux stone veneer you need depends on the size of the area you want to cover. To ensure you are prepared with enough material, follow these steps:
-
Measure the length and height of the area you want to cover
-
Input your measurements into the online calculator on the product page of your chosen style of faux stone panel
Depending on where you’re planning to install your panels and the style of panel you’ve selected, the installation process may look a little different. Check out our installation knowledge base for helpful resources. We also recommend you view the video below for detailed guidance.
Once you have your panels in hand, and you’re ready to install, make sure your installation surface is in good sound condition. Then, gather the following tools and materials:
-
Caulk gun
-
Chalk line or laser
-
Clean cloth
-
Color-coordinating textured caulk
-
Cotton swabs
-
Level
-
Loctite PL Premium 3X Construction Adhesive
-
Panels
-
Pencil
-
Safety glasses
-
Small paint brush
-
T-square
-
Tack cloth
-
Tape measure
-
Touchup kit
-
Water
-
Wood cutting saw with finish blade
Depending on the installation method that’s best for your project, gather the following additional materials.
Adhesive and Fastener Installation:
-
Deck screws
-
Screw gun/drill driver and drill bits
Adhesive Only Over Concrete/Masonry/Metal:
-
Disposable gloves
-
Great Stuff Applicator Gun
-
Great Stuff Pro Gun Cleaner
-
Great Stuff Pro Construction Adhesive
How to Determine Installation Workflow
Before starting, look at your panels to determine which way they must be installed.
Installation will run left to right or right to left depending on the panel style. Orient one of your panels so that the flat lip on the long side (A) is up. If the fingers project to the left, the installation will run left to right. If the fingers are on the right side of the panel, your installation will go right to left.
 Faux stone panels installation workflow diagram
Installation Day Summary
Please note that if you chose the beautifully rugged Sardis Fieldstone panels, installation is a bit different, see style-specific installation instructions here.
Step 1: Orient Panels & Determine Installation Order
For the most realistic look, establish an order for your panels by laying them out before you install them. As you lay them out, look at the variation in color and texture from panel to panel. Make sure no one section draws the eye.
Step 2: Prepare Surfaces
Thoroughly clean the wall to ensure solid and lasting adhesion. If you’re installing over top of concrete or masonry, you may need to use a wire brush to remove loose particles. Wipe the back of the panels with a tack cloth to remove any dust or dirt.
Step 3: Trim Your First Panel
Mark where you intend to cut the panel. We recommend cutting off at least 1/4 of the panel to minimize waste. Trim the panel, using a wood cutting saw with a finish blade. The slot side will be used first. Reserve the finger side for later.
If you’re installing Spencer or Asheville panels: Determine the number of panels needed to run the length of your first row. Then, trim the projections off the bottom of the panels so they will sit flush with the floor/ground. Trim the fingers off the first panel.
Step 4: Draw a Level Line
Using a level, find the high point on the floor/ ground. Place a full size panel against the wall and mark the height. Extended that level line the length of the wall.
Step 5: Apply Adhesive
Wipe the back of the panel to remove any dust or debris.
If you’re using the adhesive-only method, apply beads of adhesive to the back of the panel in vertical lines starting 2” from the edge, and in 6” increments along the interior of the panel. Then, add a dab on the back of each panel finger.
For the adhesive and fastener method, apply beads of adhesive to the back of the panel in vertical lines spaced no more than 3” apart. Then add a dab of adhesive to the back of each finger.
Step 6: Adhere the Panel to the Wall
Using a slight twisting motion, adhere the panel to the wall. Make sure the panel lines up with the level line and is plumb with the edge of the wall.
Step 7: Screw the Panel to the Wall
If you’re using the adhesive-only method, skip this step.
Place 1 screw per foot along the perimeter and 1 screw per square foot in the middle of the panel. Screws should be slightly recessed. Take care to not over-tighten your screws.
Step 8: Apply Adhesive and Textured Caulk
Add adhesive to the lip of the panel about 1” from the face. Then, apply a bead of textured caulk where the face meets the panel. You must add caulk during this step to protect your panels from moisture and for a more realistic finished look.
Step 9: Repeat Steps 5-8
Be sure to butt the panels tightly together while following your level line. Dry fit each panel before applying adhesive to ensure it fits flush. Trim as needed. The last panel on the row will have to be trimmed from the finger side of the panel.
Before it dries, wipe off any excess caulk or adhesive.
Step 10: Repeat Steps 5-8
Start the next row directly above the first panel. Trim the first panel of the next row so, when installed, the seams will be offset.
Note: Spencer and Asheville panels will not have offset seams. Trim only the left fingers off the starting panel.
Before installing each panel on the next row apply adhesive to the top lip of the panel below. Make sure each panel fits tight with the panel below. Panels should come together to create a shiplap joint.
Step 11: Touch-Up As Needed
For the most natural, realistic appearance, touch up your work as needed.
Add a bead of caulk to seal any mitered joints and where a panel butts against another surface (like an adjoining wall). Use caulk to fill in voids, gaps, and holes from screw heads.
If your touch-up kit contains a base coat, use a cotton swab to apply a light layer of the base coat. Allow it to dry completely.
Using a paint brush, apply the appropriate paint then dab with a soft cloth to blend and allow to dry completely.
If your touch-up kit contains a wash, apply the wash using a paint brush and dab it with a soft cloth to blend. If the bottle is labeled “wash concentrate” add tap water to the neck of the bottle, and shake to mix before using.
Faux Stone Panel Design Ideas
Looking for inspiration? Here are a few of our favorite ways to use faux stone panels. If you need more creative ideas, check out our design gallery.
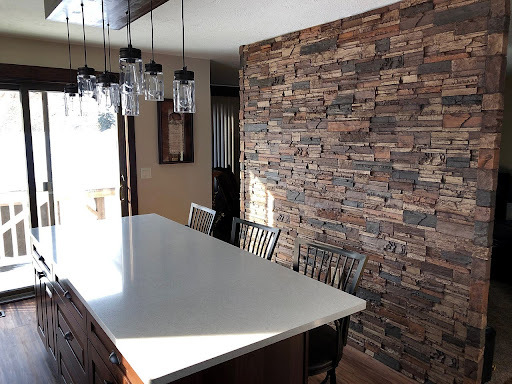
1. Create a Stunning Faux Stone Accent Wall
This dining area is welcoming and inviting thanks to the Lexington Dry Stack Faux Stone accent wall.
The Sienna panel color includes rich, earthy tones that blend seamlessly into the room’s existing cabinetry and lighting.
 Create a Stunning Faux Stone Accent Wall
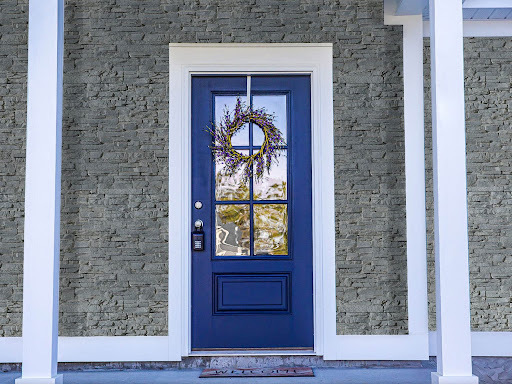 Boost Curb Appeal With Faux Stacked Stone
2. Boost Curb Appeal With Faux Stacked Stone
Use faux stone panels to add character to your home’s exterior. This homeowner installed Sedona Dry Stack Faux Stone Panels in Frosted Stone to frame the front door and add visual interest to their home’s exterior.
Faux stone panel exterior installation is just as easy as interior installation, but be sure to follow outdoor-specific instructions.
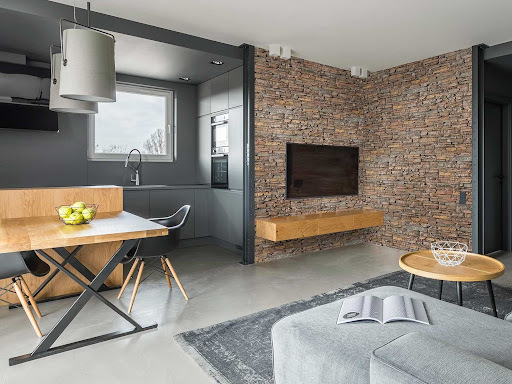
3. Define an Open Concept Space With Faux Stone Panels
If your kitchen, dining, and living areas share one large space, consider breaking it up with an accent wall.
This wall, visually separating the living area from the kitchen and dining, is covered with Sedona Dry Stack Faux Stone Panels in Brown Earth.
 Define an Open Concept Space With Faux Stone Panels
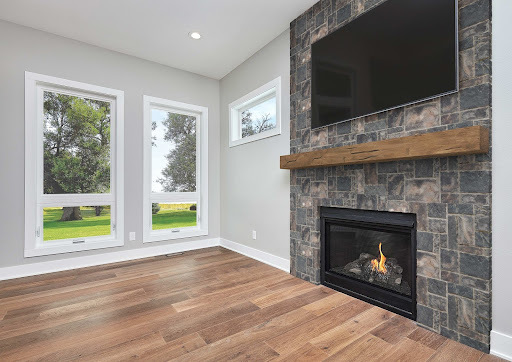 Use Faux Stone Panels as an Eye-Catching Fireplace Surround
4. Use Faux Stone Panels as an Eye-Catching Fireplace Surround
A fireplace is the centerpiece of any space, so why not give it a whole new look?
This beautiful fireplace transformation was achieved using Asheville Block Faux Stone Panels in Cliff Gray.
How to Choose the Right Faux Stone Panel For Your Project
If you’re interested in adding stone accents to your home, faux stone veneer panels allow you to do that without breaking the bank. To choose the right panels for your project, consider the following.
Colors
Choose colors that will either enhance those already present in the space or else contrast them to add some visual interest. For example, if your living room has cool colors, you might decide to add some reds or warm browns to cozy things up a little.
Textures
The texture you choose is a matter of personal preference, but it’s important to consider that some textures offer a rough-cut aesthetic while others look more refined.
If you prefer a rougher, more rugged look, Billings’ jagged surface is a great option, whereas Lexington's tightly squared angles give a more finished look.
Quality
There are several faux stone panel options available on the market. Make sure you’re choosing a quality panel. A quality panel is durable, easy to install, looks just like real stone, and can withstand normal weather conditions.
We suggest ordering samples so you can touch and see them in person before you make a decision. You can get samples of any of our panels before you place an order!
Even better, after you purchase samples you will receive a coupon code that will deduct the cost of the samples from your full product purchase.
Level of Detail
The stone style and color you choose depend on how much granular detail you want to add to the visual aesthetic of a space.
Panels that have uniform-sized or larger stones will contribute to a simpler aesthetic, and won’t draw attention away from other elements in the room. They can also help tone down more chaotic areas.
On the other hand, the variety of stone sizes shown on Fargo or Lexington stone panels can provide a striking contrast to an otherwise bland area, shaking things up with a diverse appearance.
Ready to Transform Your Home With Faux Stone Panels?
 Sedona Dry Stack Faux Stone Panels in Slate Gray
Installing faux stone panels in your home is an affordable, versatile, and low-maintenance way to elevate the look and feel of any space.
Whether you're transforming your fireplace, creating an accent wall, or boosting your home’s curb appeal, faux stone provides the authentic stone look without the hefty price tag or labor-intensive installation.
With a variety of styles, colors, and textures to choose from, it's easy to find an option that suits your design. Start your home transformation by browsing our full collection of faux stone panels!